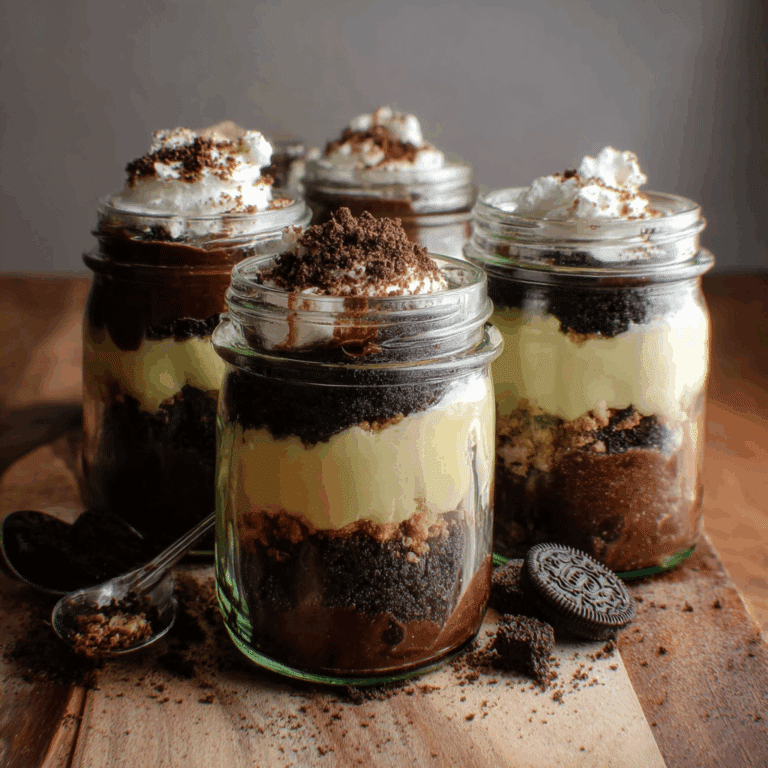
How to Make Easter Dirt Pudding Jars Fast

If you’re looking for a quick, fun, and absolutely delicious dessert for your Easter celebration, look no further than Easter Dirt Pudding Jars. This delightful treat layers creamy pudding, crunchy cookies, and a hint of sweetness all packed perfectly in jars for an adorable presentation. Whether you’re hosting a family gathering or want to create a festive snack with the kids, these Easter Dirt Pudding Jars are simple to make and sure to impress. Learn how to make Easter Dirt Pudding Jars fast with this easy, delicious recipe perfect for festive treats and family fun!
Why You’ll Love This Recipe
- Quick and Easy: Ready in under 15 minutes, perfect for last-minute treats.
- Kid-Friendly Fun: Great for involving little hands in layering and decorating.
- Portable and Individual: Perfectly portioned in jars, making serving a breeze.
- Delicious Texture: Creamy pudding meets crunchy cookie crumbs for irresistible bites.
- Visually Festive: Looks charming and colorful, perfect for a holiday table or gift.
Ingredients You’ll Need
These ingredients are straightforward and easy to find, each bringing its own magic to the texture, taste, and festive look of your Easter Dirt Pudding Jars. From smooth pudding to crumbly cookies and a touch of sweetness, every component counts!
- Instant Chocolate Pudding Mix: The base that offers creamy, rich chocolate flavor in minutes.
- Milk: Helps the pudding set up perfectly with the right consistency.
- Crushed Chocolate Sandwich Cookies: Adds a crunchy, “dirt-like” texture that contrasts beautifully with the pudding.
- Vanilla or Chocolate Wafers (optional): For an added layer of flavor or substitute cookie crumbs.
- Gummy Worms: The cute, playful topping that makes these jars perfect for Easter themes.
- Whipped Cream: Adds lightness and extra creaminess on top.
- Mini Candy Eggs or Sprinkles: For colorful finishing touches that scream spring and Easter!
Variations for Easter Dirt Pudding Jars
Feel free to personalize your Easter Dirt Pudding Jars based on your pantry stash, dietary needs, or creative cravings. This recipe welcomes twists and tweaks without any fuss!
- Dairy-Free Version: Use coconut milk pudding and dairy-free whipped cream for a lactose-friendly treat.
- Peanut Butter Twist: Swirl in peanut butter or use peanut butter cookies for a nutty surprise.
- Fruit Addition: Layer in crushed strawberries or blueberries for bursts of freshness and color.
- Alternative Cookies: Try gluten-free sandwich cookies or graham cracker crumbs to switch up textures.
- Chocolate Lovers: Add mini chocolate chips or drizzle melted chocolate on top for extra indulgence.

How to Make Easter Dirt Pudding Jars
Step 1: Prepare the Pudding
In a mixing bowl, whisk together the instant chocolate pudding mix with the required amount of cold milk until thickened, which usually takes about 2 minutes. Set aside while you prepare your cookie crumbs.
Step 2: Crush the Cookies
Place your chocolate sandwich cookies or wafers in a sealed plastic bag and crush them with a rolling pin until they reach a fine, crumbly texture resembling dirt.
Step 3: Layer the Jars
Start by spooning a layer of cookie crumbs into the bottom of each jar, followed by a generous layer of pudding. Repeat to build at least two layers, finishing with cookie crumbs on top.
Step 4: Add Whipped Cream and Toppings
Top each jar with a dollop of whipped cream and then decorate with gummy worms, mini candy eggs, or colorful sprinkles to bring the Easter theme to life.
Step 5: Chill Before Serving
Place the jars in the refrigerator for at least 30 minutes to let the pudding set and flavors meld before enjoying.
Pro Tips for Making Easter Dirt Pudding Jars
- Use Cold Milk: For the pudding to thicken quickly and achieve the best texture.
- Layer Neatly: Use a piping bag or spoon for clean layers in the jar, making it more visually appealing.
- Don’t Overdo the Cookie Layer: Too much cookie crumbs can overwhelm the creamy pudding balance.
- Choose the Right Size Jar: Small mason jars or clear cups work great for the perfect portion control.
- Chill Properly: Letting the jars rest helps deepen flavors and firm up the dessert.
- Add Toppings Just Before Serving: To keep gummy worms and sprinkles fresh and colorful.
How to Serve Easter Dirt Pudding Jars
Garnishes
Decorate each jar with fun Easter-themed toppings like gummy worms crawling on top, colorful mini candy eggs sprinkled as “eggs in the dirt,” and a crown of fluffy whipped cream for that perfect finish.
Side Dishes
Pair these pudding jars with light, fresh sides such as fruit salad or carrot sticks with hummus, balancing sweet and savory for a family-friendly spread.
Creative Ways to Present
Arrange the jars in a rustic wooden crate or on a tiered dessert stand alongside spring flowers and pastel napkins. Wrapping a small spoon with a ribbon around each jar creates an inviting and gift-ready look.
Make Ahead and Storage
Storing Leftovers
Store any leftover Easter Dirt Pudding Jars tightly covered in the refrigerator for up to 2 days to keep the pudding fresh and the cookie crumbs from getting soggy.
Freezing
Freezing is not recommended because the pudding texture changes when thawed, but you can prepare the cookie crumbs and pudding separately ahead of time for quicker assembly later.
Reheating
Since this is a chilled dessert, reheating is unnecessary. Simply enjoy it cold right from the fridge for that perfect creamy and crunchy contrast.
FAQs
Can I use homemade pudding instead of instant mix?
Absolutely! Homemade pudding works wonderfully but may require extra chilling time to set firmly before assembling the jars.
What can I substitute for gummy worms?
If gummy worms aren’t your thing, try sour belts cut into strips, jelly beans, or even little marshmallows for fun Easter decoration.
Are these jars suitable for kids with allergies?
Yes, with ingredient swaps like dairy-free pudding and allergy-friendly cookies, these jars can be adapted for many dietary needs.
How many jars does this recipe make?
Typically, this recipe yields around 6 to 8 small jars depending on the size but can be easily adjusted to serve more or less.
Can I use clear plastic cups instead of jars?
Definitely! Clear plastic cups work just as well for layering and showing off the fun Easter dirt pudding layers.
Final Thoughts
Easter Dirt Pudding Jars are one of those magical desserts where simplicity meets pure joy—easy to whip up, fun to eat, and festive to look at. Whether you’re making this with kids or just want a quick holiday-inspired treat, this recipe will brighten your Easter table and bring smiles all around. Don’t wait to try out this easy and delicious dessert—your family and friends will thank you!
Related Posts
- How to Bake the Perfect Strawberry Lemon Cake
- How to Make Irresistible Tiramisu Cupcakes
- Easy Strawberry Shortcake Trifles to Delight
Easter Dirt Pudding Jars
Easter Dirt Pudding Jars are a quick, fun, and delicious dessert perfect for Easter celebrations. These individual jars layer creamy instant chocolate pudding, crunchy cookie crumbs, whipped cream, and festive toppings like gummy worms and mini candy eggs. Ready in under 15 minutes, they are kid-friendly, portable, and visually appealing, making them an ideal treat for family gatherings or holiday snacks.
- Total Time: 40 minutes
- Yield: 6 to 8 small jars 1x
Ingredients
Main Ingredients
- 1 package Instant Chocolate Pudding Mix (3.4 oz)
- 2 cups cold Milk
- 15–20 Chocolate Sandwich Cookies, crushed
- Optional: Vanilla or Chocolate Wafers (for added flavor or substitute)
- Whipped Cream (for topping)
- Gummy Worms (for decoration)
- Mini Candy Eggs or Sprinkles (for garnish)
Instructions
- Prepare the Pudding: In a mixing bowl, whisk together the instant chocolate pudding mix with 2 cups of cold milk until thickened, about 2 minutes. Set aside.
- Crush the Cookies: Place chocolate sandwich cookies or wafers in a sealed plastic bag and crush with a rolling pin until fine, crumbly, and dirt-like in texture.
- Layer the Jars: Spoon a layer of cookie crumbs into the bottom of each jar, followed by a generous layer of pudding. Repeat to create at least two layers, finishing with a top layer of cookie crumbs.
- Add Whipped Cream and Toppings: Add a dollop of whipped cream on top of each jar, then decorate with gummy worms, mini candy eggs, or colorful sprinkles to create a festive Easter look.
- Chill Before Serving: Refrigerate the jars for at least 30 minutes to allow the pudding to set and the flavors to meld before serving.
Notes
- Use cold milk to help the pudding thicken quickly and achieve the best texture.
- Layer neatly using a piping bag or spoon for clean, visually appealing layers.
- Avoid too much cookie crumb layer to maintain a good balance of creamy pudding and crunchy texture.
- Small mason jars or clear cups are ideal for portion control and presentation.
- Chill jars properly to deepen flavors and firm up the dessert.
- Add toppings just before serving to keep gummy worms and sprinkles fresh and colorful.
- Prep Time: 10 minutes
- Cook Time: 0 minutes
- Category: Dessert
- Method: No-Bake
- Cuisine: American
- Diet: Vegetarian
Nutrition
- Serving Size: 1 small jar
- Calories: 250
- Sugar: 20g
- Sodium: 150mg
- Fat: 10g
- Saturated Fat: 6g
- Unsaturated Fat: 3g
- Trans Fat: 0g
- Carbohydrates: 35g
- Fiber: 1g
- Protein: 3g
- Cholesterol: 20mg
Keywords: Easter dessert, pudding jars, no-bake dessert, kid-friendly dessert, chocolate pudding, festive treats