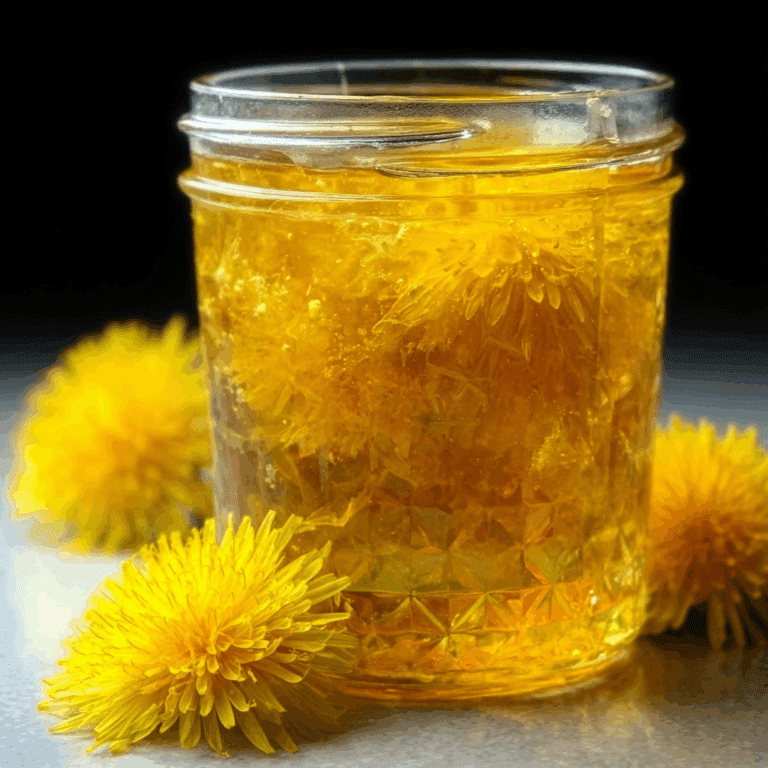
How to Make Delicious Dandelion Jelly at Home

If you’ve ever wandered through a sunny meadow or a neighborhood lawn in springtime, chances are you encountered bright yellow dandelion flowers just begging to be picked. But beyond their cheerful appearance, these humble blooms make an extraordinary sweet treat called Dandelion Jelly. This delightful homemade jelly captures the subtle floral notes and golden color of fresh dandelions, turning foraged flowers into a unique, tasty spread perfect for toast, scones, or gifts. Ready to dive into a charming kitchen project? Let’s explore how to make delicious Dandelion Jelly that will brighten your mornings and impress your friends!
Why You’ll Love This Recipe
- Nature’s Gift: Enjoy a homemade treat using wild, freely available dandelions that connect you to the outdoors.
- Unique Flavor Profile: The subtle floral and honey-like notes provide a fresh twist on traditional fruit jellies.
- Beautiful Golden Hue: The natural color adds a lovely sunshine-yellow brightness to your breakfast spread.
- Simple Ingredients: You only need a handful of pantry staples plus dandelions, making this recipe easy for everyone.
- Great for Gifting: Homemade dandelion jelly jars make thoughtful and charming gifts that surprise and delight.
Ingredients You’ll Need
Making Dandelion Jelly is refreshingly simple with just a few essential ingredients. Each plays a vital role in balancing sweetness, setting the jelly, and capturing that delicate floral essence.
- Fresh dandelion petals: Pick bright yellow petals from healthy, pesticide-free plants for the freshest flavor.
- Granulated sugar: This sweetens the jelly and helps it set properly.
- Water: Used to gently extract the lovely flavor from the dandelions during infusion.
- Lemon juice: Provides natural acidity to balance sweetness and helps with the jelly’s gel formation.
- Pectin: The natural jelly-making agent essential for achieving the perfect spreadable consistency.
Variations for Dandelion Jelly
Feel free to get creative with your Dandelion Jelly! This recipe adapts well to add-ins and tweaks based on taste preferences or dietary needs, making it easy to customize a unique version.
- Honey swap: Replace granulated sugar with honey for a richer, floral sweetness while maintaining natural ingredients.
- Citrus twist: Add orange or grapefruit zest for a bright, zesty undertone that complements the floral notes.
- Herbal infusion: Stir in fresh herbs like mint or thyme during the dandelion steeping for an added layer of complexity.
- Low sugar version: Use low-sugar pectin and reduce sugar amounts for a lighter jelly option.
- Mixed flower jelly: Combine dandelion petals with other edible flowers like nasturtiums or violets for a floral medley.

How to Make Dandelion Jelly
Step 1: Harvest and Prepare the Dandelions
Start by picking vibrant yellow dandelion petals, avoiding the green parts to prevent bitterness. Rinse petals gently in cool water to remove any dirt or tiny insects.
Step 2: Steep the Petals
Place the clean petals in a large bowl and pour boiling water over them. Cover and let them steep for 24 hours at room temperature to extract the delicate floral flavor and color.
Step 3: Strain the Petal Infusion
After steeping, strain the liquid through a fine mesh or cheesecloth, pressing gently to extract every bit of flavor while discarding the petals.
Step 4: Prepare the Jelly Mixture
Pour the dandelion infusion into a large pot and add lemon juice and pectin. Stir well before introducing sugar to ensure even distribution.
Step 5: Cook and Thicken
Bring the mixture to a boil over medium-high heat, stirring constantly. Add sugar and continue boiling hard for 1 to 2 minutes until the jelly reaches gel point (around 220°F or 104°C).
Step 6: Jar and Seal
Quickly ladle the hot jelly into sterilized jars, leaving appropriate headspace. Wipe rims clean, seal tightly, and process in a hot water bath for 10 minutes to safely preserve your jelly.
Pro Tips for Making Dandelion Jelly
- Pick petals early: Harvest dandelions in the morning when they are freshest for the best flavor and color.
- Avoid green parts: Use only the yellow petals, as green parts can add unwanted bitterness.
- Test gel point: Use a candy thermometer or the wrinkle test on a chilled spoon to ensure jelly sets perfectly.
- Use clean jars: Properly sterilize jars and lids to prevent spoilage and extend shelf life.
- Label and date: Always mark your jars to keep track of freshness over time.
How to Serve Dandelion Jelly
Garnishes
Garnish your serving plate with fresh dandelion petals or edible flowers to visually tie the jelly back to its floral roots, creating an inviting and cheerful presentation.
Side Dishes
Dandelion Jelly pairs wonderfully with warm buttered toast, homemade scones, or soft cheeses like brie and cream cheese for an elegant breakfast or snack.
Creative Ways to Present
Try spooning Dandelion Jelly over vanilla yogurt or drizzle it atop panna cotta for a surprising floral twist in desserts that will wow guests.
Make Ahead and Storage
Storing Leftovers
Once opened, keep your Dandelion Jelly refrigerated and consume within three weeks for the freshest taste and texture.
Freezing
If you want to store jelly for longer, freezing it in airtight containers works well—just thaw slowly in the fridge before use to preserve flavor and consistency.
Reheating
There’s no need to reheat jelly before serving, but if desired, warm gently on the stove or in a microwave-safe container to soften the texture for spreading.
FAQs
Can I use dandelion leaves instead of petals?
It’s best to stick with yellow petals because leaves can be bitter and will affect the flavor and clarity of your jelly.
How do I know when the jelly is set?
A good test is to place a small amount on a chilled plate—if it wrinkles when pushed with a finger, it’s ready.
Are dandelions safe to eat?
Yes, as long as you harvest from areas free of pesticides, herbicides, and pollution, dandelions are perfectly safe and nutritious to use.
Can I make this jelly without pectin?
Pectin is key for achieving that classic jelly texture, but you can make a syrupy spread by skipping it, though it won’t set firmly.
How long does homemade Dandelion Jelly last?
Unopened and properly canned jelly can last up to one year stored in a cool, dark place; after opening, refrigerate and consume within three weeks.
Final Thoughts
Making your own Dandelion Jelly is more than just a recipe; it’s a charming way to capture the sweetness of spring’s simplest flower in a jar. It’s approachable, rewarding, and a delightful way to share a little sunshine with friends and family. So grab some fresh petals, roll up your sleeves, and create this unique spread that’s sure to become a beloved staple in your kitchen!
Related Posts
- How to Make Strawberry Shortcake Cheesecake Rolls
- How to Make Strawberry Frosted Matcha Cookies
- How to Make Reese’s Peanut Butter Cup Cheesecake Recipe
Dandelion Jelly
Dandelion Jelly is a charming homemade treat that transforms freshly foraged dandelion petals into a sweet, floral jelly with a beautiful golden hue. Perfect for spreading on toast, scones, or gifting to friends, this recipe uses simple ingredients like fresh dandelion petals, sugar, lemon juice, pectin, and water to create a unique jelly that captures the subtle honey-like notes and sunshine color of spring.
- Total Time: Approximately 25 hours 35 minutes
- Yield: About 4 to 5 half-pint (8 oz) jars 1x
Ingredients
Ingredients
- 4 cups fresh dandelion petals (yellow parts only, no green stems)
- 4 cups water
- 1 package fruit pectin (about 1.75 ounces)
- 1 tablespoon lemon juice
- 5 cups granulated sugar
Instructions
- Harvest and Prepare the Dandelions: Start by picking vibrant yellow dandelion petals, avoiding the green parts to prevent bitterness. Rinse petals gently in cool water to remove any dirt or tiny insects.
- Steep the Petals: Place the clean petals in a large bowl and pour boiling water over them. Cover and let them steep for 24 hours at room temperature to extract the delicate floral flavor and color.
- Strain the Petal Infusion: After steeping, strain the liquid through a fine mesh or cheesecloth, pressing gently to extract every bit of flavor while discarding the petals.
- Prepare the Jelly Mixture: Pour the dandelion infusion into a large pot and add lemon juice and pectin. Stir well before introducing sugar to ensure even distribution.
- Cook and Thicken: Bring the mixture to a boil over medium-high heat, stirring constantly. Add sugar and continue boiling hard for 1 to 2 minutes until the jelly reaches gel point (around 220°F or 104°C).
- Jar and Seal: Quickly ladle the hot jelly into sterilized jars, leaving appropriate headspace. Wipe rims clean, seal tightly, and process in a hot water bath for 10 minutes to safely preserve your jelly.
Notes
- Pick petals early in the morning when they are freshest for best flavor and color.
- Use only yellow petals to avoid bitterness from green parts.
- Test gel point using a candy thermometer or by placing a small amount on a chilled spoon to check if it wrinkles.
- Properly sterilize jars and lids to extend shelf life and prevent spoilage.
- Label jars with date to keep track of freshness.
- Prep Time: 25 minutes (plus 24 hours steeping)
- Cook Time: 10 minutes
- Category: Appetizers
- Method: Boiling and Hot Water Bath Canning
- Cuisine: American
- Diet: Gluten Free
Nutrition
- Serving Size: 1 tablespoon
- Calories: 50
- Sugar: 13g
- Sodium: 0mg
- Fat: 0g
- Saturated Fat: 0g
- Unsaturated Fat: 0g
- Trans Fat: 0g
- Carbohydrates: 13g
- Fiber: 0g
- Protein: 0g
- Cholesterol: 0mg
Keywords: Dandelion jelly, homemade jelly, flower jelly, wildflower jelly, foraged jelly, spring jelly, floral jelly